Hello Maker Vibers. Say hello to the AS5600! This sensor tracks the rotation of a tiny magnet with insane precision even beyond 360 degrees — and it costs under 3 bucks!
In this guide, I’ll show you what parts you need to get the AS5600 sensor working, how to wire it all up and how to code it from absolute scratch so that you can start using this amazing sensor in your projects right away.
The parts you need
- AS5600 sensor module. You can get the one I’m using from DigiKey here, but you can also get many varieties from Amazon.
- Arduino Uno. This is the microcontorller used in the project.
- Jumper wires. You’ll need these to connect the AS5600 sensor to the Arduino.
- 3D printed enclosure. The magnet needs to be held above the sensor in a very precise way. I made an enclosure based on the manufacturer’s recommendations, which you can download here. Be sure to print this with a 0.25mm nozzle and at 0.15mm layer height for best results.
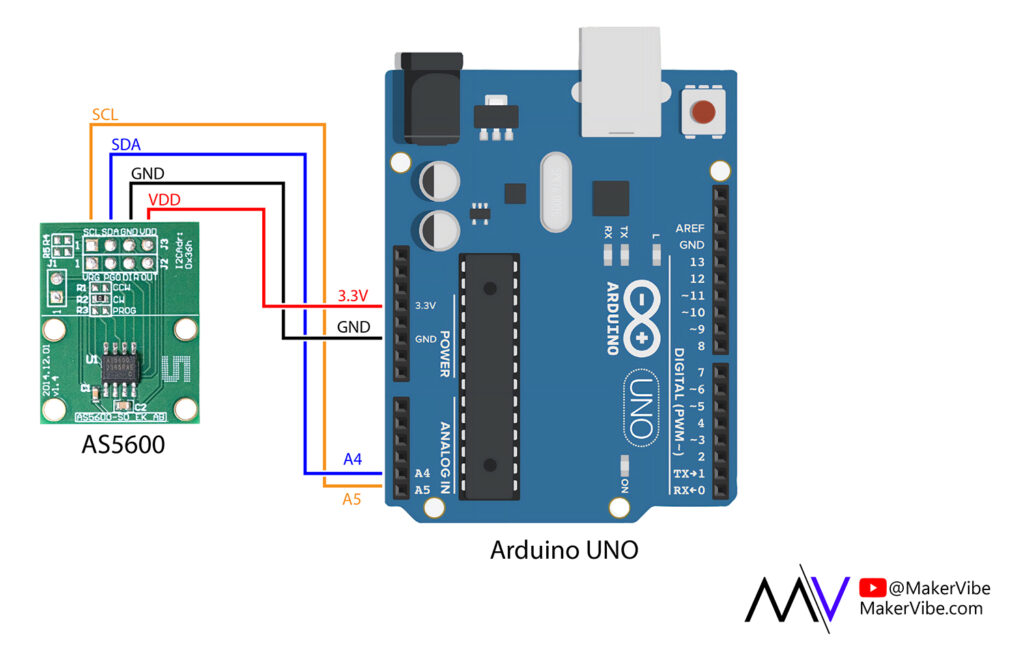
Wiring up the AS5600 sensor
The easiest way to connect the AS5600 is through the I2C protocol. To do that, use the diagram below:
Programming the Arduino Uno
The easiest way to code the sensor is to use the library by Rob Tillaart. To do so, open up your Arduino IDE, head over to the Library Manager and search for “AS5600”. You’ll find the Library by Rob Tillaart, which is the one you need to install.
1) Reading in 0-360 values
The most basic function of the AS5600 is to read in 0 to 360 degrees. To write the code for this, open up your Arduino IDE and paste in the following code:
#include <Wire.h>
#include "AS5600.h" //Library by Rob Tillaart

AS5600 as5600;

void setup() {
  Serial.begin(9600);
  Wire.begin();
}

void loop() {
  uint16_t raw = as5600.rawAngle();
  float angle = raw * (360.0 / 4096.0);
  Serial.println(angle, 1);
  delay(25);
}2) Reading in any angle, including below 0 and above 360
To fully unwrap the sensor, there are few more lines of code you need to add:
#include <Wire.h>
#include "AS5600.h" //Library by Rob Tillart

AS5600 as5600;

int32_t turn_count = 0;
uint16_t prev_raw = 0;

void setup() {
  Serial.begin(9600);
  Wire.begin();
  prev_raw = as5600.rawAngle();
}

void loop() {
  uint16_t raw = as5600.rawAngle();
  int16_t delta = (int16_t)(raw - prev_raw);  // signed wraparound-safe

  turn_count += (delta < -2048) - (delta > 2048);

  prev_raw = raw;
  float angle = (turn_count * 360.0) + (raw * 360.0 / 4096.0);
  Serial.println(angle, 1);
  delay(25);
}And that’s it! Once you’ve uploaded that code, you should be able to read in any angle from the sensor with great speed and accuracy.
3D printable model download
BOM for physical assembly
- 3D printed model parts
- AS5600 sensor
- 6mm diametric magnet
- M4x20mm screws (x1)
- M4 nyloc nuts (x2)
- M4 normal nut (x1)
- M2x20mm screws (x4)
- M2x4mm screws (x2)